7 Tips for Splicing Metal Studs Together
Splicing Metal Studs Together can look simple on the floor: two thin steel sections overlap, a screw gun is ready, and the wall line needs to stay straight. But a splice changes how a stud carries and transfers load. The right detail depends on the stud’s role, its gauge, the connection method, and the project documents. Small mistakes can leave a visible bulge or a connection that does not match the design.
Industry sources help set the context, though they do not answer every field question. The U.S. Census Bureau’s Value of Construction Put in Place series tracks construction activity, but it does not measure splice performance. For technical requirements, AISI S220 covers nonstructural cold-formed steel framing, while AISI S240 addresses structural framing. These standards are useful references; they are not substitutes for approved plans or manufacturer instructions. Check the details before fastening.
Dr. Benjamin W. Schafer, a cold-formed steel researcher at Johns Hopkins University, offers a relevant principle in paraphrase, not as a verbatim quotation: “Treat the connection as part of the structural system, not as an isolated piece of metal.” That distinction matters. This guide’s seven tips focus on practical checks: matching stud sizes, confirming overlap, maintaining alignment, selecting specified fasteners, and inspecting the finished joint. One detail is easy to miss: a neat-looking splice is not automatically a sound one. When the drawings are unclear, pause and ask the project engineer or manufacturer before proceeding.

Understand When Metal Studs Need Splicing and What Loads They Carry
Metal studs need splicing when wall height exceeds available stud length or a design requires a continuous member. But a splice is not automatically a safe extension. In load-bearing walls, studs may carry vertical floor or roof loads, while sheathing and connections help resist lateral forces. Loads travel through the splice, tracks, and supporting structure. A weak joint can interrupt that path.
The American Iron and Steel Institute’s AISI S100-20 design standard bases cold-formed steel member strength on material properties, section dimensions, and restraint. Common specified yield-strength grades include 33 ksi and 50 ksi; neither value is an allowable wall load. Actual capacity depends on the full assembly and design conditions. Check the project drawings and manufacturer-neutral engineering calculations before selecting a splice. Field conditions can differ. That detail is easy to miss.
Tip: Overlap the studs only as specified in the design, and use the required fastener type, spacing, and pattern. Keep the joint aligned; a twisted splice can complicate sheathing and load transfer. For non-load-bearing partitions, confirm the splice still maintains alignment and supports attached finishes. Record the stud thickness and grade, then have a qualified designer review load-bearing splices. It may feel cautious, but guessing at capacity is worse.
7 Tips for Splicing Metal Studs Together
Understand when metal studs need splicing and what loads they carry.
Selected ASTM A1003 structural steel grades have specified minimum yield strengths of 33 ksi and 50 ksi. These are material properties, not splice capacities. A splice must be designed for the actual axial, shear, and bending forces, along with the stud section, connection details, and applicable design requirements.
Choose Compatible Studs, Splice Plates, and Fasteners
7 Tips for Splicing Metal Studs Together
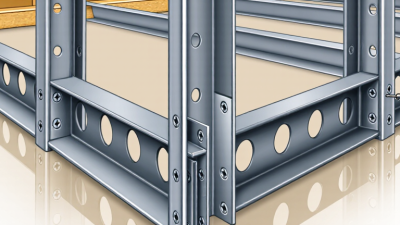
Choose studs with matching depth, flange width, steel thickness, and profile. A plate made for a different stud can leave gaps or cause misalignment. Check the project drawings and product specifications before cutting or fastening. The splice should suit the wall’s load requirements, not just look snug. Small differences matter.
Tip: Test the fit first. Place the splice plate against both stud ends and check that the faces sit flat. Keep the studs aligned, with no sharp offset at the joint. Use a plate designed for the stud system and required connection. A quick dry fit can reveal a mismatch before holes are made. Easy to miss.
Tip: Match fasteners to the stud and plate materials. Use the type, length, and spacing specified in approved project details; avoid substituting whatever screws are nearby. Fasteners should seat firmly without stripping or deforming the thin steel. Check that the coating is compatible, especially in damp areas. It is tempting to rush this step, and that is where avoidable rework starts. When details are unclear, confirm them with the project designer or a qualified building professional.
Measure, Cut, and Prepare Stud Ends for a Secure Joint
A secure splice begins with an accurate measurement, not a guess.
Measure the stud at the planned joint and check the wall layout before cutting. Mark the web and both flanges so the cut stays square. A crooked end can leave gaps and pull the splice out of line. Use a tool suited to the stud’s thickness, then remove sharp burrs with a file. Wear gloves; fresh-cut steel edges are unforgiving.
Check the ends before joining them. They should sit flush, with the webs aligned and the flanges facing the same direction. Dry-fit the pieces first. It takes seconds. Keep the protective coating intact where possible, and clear away metal chips that could prevent close contact. The splice method and fastener pattern must match the approved framing detail, especially on load-bearing walls; stud gauge and wall design matter. Don’t improvise a connection from spare scraps. I’ve found that rushing the measurement is the mistake most likely to create extra trimming later. Recheck the length and alignment before fastening, even when the cut looks right.
Align the Studs and Fasten the Splice in the Correct Sequence
Set both metal studs on a flat surface, with their webs facing the same direction.
Check the required overlap against the project details; splice lengths and fastener patterns can vary. Clean away metal burrs, then mark the overlap on both pieces. A pencil line helps keep the ends from creeping while you work.
Small shifts matter.
Bring the studs together and align their flanges and webs before fastening anything. Use clamps to hold the splice, then check that the assembly is straight and the flanges sit flush. Install the specified fasteners in the sequence shown in the approved detail, working from one end and alternating sides when directed. This helps limit twisting. Don’t use extra screws to compensate for a poor fit; they can distort thin steel.
I once rushed this check and had to back out a screw after the web pulled off line. Annoying, but useful.
Recheck alignment as you fasten, and confirm the splice remains straight with a level or straightedge. If the stud shifts, stop and reset the clamps before continuing. Follow the project’s requirements for screw type, spacing, and quantity.
Inspect the Joint for Stability, Code Compliance, and Clearances
A spliced metal stud can look straight and still shift under pressure. Check the joint by hand before closing the wall: it should not twist, rock, or open when you press near the connection. The stud ends should align without a sharp step, and the specified fasteners should be present, seated, and free of loose or damaged edges. A small gap may seem harmless. It can still telegraph movement into the finished surface.
Compare the splice with the approved drawings and the locally adopted building code. Requirements can vary with wall height, load, stud gauge, and whether the wall is rated or structural, so avoid guessing at fastener patterns. If the detail is unclear, pause and ask the project designer or building official.
I’ve found that a quick recheck beats patching a bowed wall later. Not glamorous, but useful.
Check clearances around the joint, too. Look for pipes, wiring, ducts, door framing, and ceiling or floor movement gaps. The splice should not pinch a service or block required firestopping. A flashlight helps reveal tight spots behind the framing. If something conflicts, do not force it into place; document the condition and confirm an acceptable adjustment before covering the wall. Be thorough, even when the connection looks fine.