Leave Your Message

7 Tips for Choosing Metal Stud Joints?

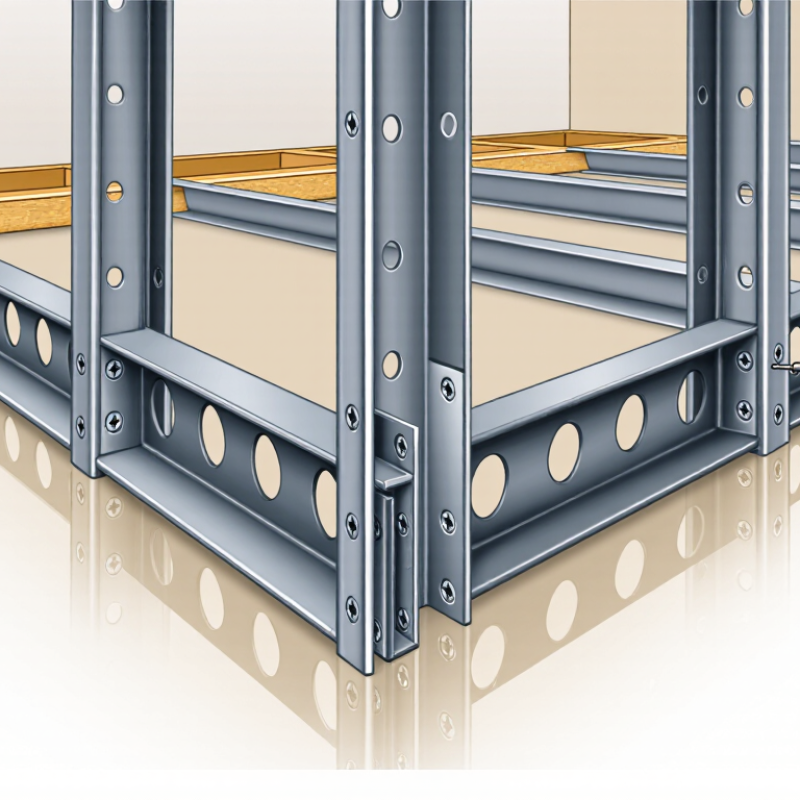
Metal Stud Joints are small connection points with large consequences. They influence wall alignment, screw retention, fire-rated assemblies, acoustic performance, and long-term movement. A joint may look secure on a busy site, yet a missing screw can create visible cracking later. It happens.

The U.S. Census Bureau reported nearly $2 trillion in construction spending during 2023. That scale makes repeatable framing decisions increasingly important. The American Iron and Steel Institute’s AISI S240 standard also stresses consistent requirements for cold-formed steel structural framing. Meanwhile, the U.S. Environmental Protection Agency estimates that construction and demolition activities generate hundreds of millions of tons of debris annually. Better joint planning can reduce rework, damaged materials, and unnecessary waste. These figures do not prove that every joint will perform well. They show why details deserve attention.

Don Allen, P.E., a recognized cold-formed steel framing engineer, offers a useful field principle: “A joint is only as reliable as its load path, fastening pattern, and installation.” That sentence is simple. The reality is less tidy. Metal thickness, stud spacing, screw edge distance, deflection, moisture exposure, and crew technique can change the result. This guide introduces seven practical tips for choosing Metal Stud Joints, from matching joint types to checking load transfer and documenting installation conditions. It also leaves room for doubt. Manufacturer guidance and project specifications must control, because a convenient connection is not always an approved one.
7 Tips for Choosing Metal Stud Joints?

Identify the Joint Type and Its Structural Purpose

7 Tips for Choosing Metal Stud Joints

Identify the Joint Type and Its Structural Purpose

A metal stud joint is not merely a connection between two pieces. Its location and purpose determine the correct detail, fastener, and installation method.

Start by identifying whether the joint is a butt joint, lap joint, corner connection, track-to-stud connection, or stud splice. Then ask what the joint must do. Does it transfer vertical load, resist lateral movement, maintain wall alignment, or allow building movement? Purpose comes first.

A load-bearing splice needs reliable force transfer and adequate bearing. A non-load-bearing partition may need flexibility instead. For example, a deflection head track should permit controlled movement without crushing the wall finish. Movement changes everything. Never treat it like a rigid connection.

Check the framing drawings, stud thickness, screw spacing, and required edge distances. Confirm whether the wall supports ceilings, cladding, or heavy fixtures. On site, a neat-looking joint can still be structurally unsuitable. I have seen joints fail because installers matched metal thickness but ignored movement requirements.

Look for twisted studs, loose screws, sharp edges, and gaps at the track. These small defects can affect board alignment and acoustic performance. Do not guess. Verify the design against applicable building codes and project specifications. When the joint carries significant load, obtain review from a qualified structural professional. That detail matters.
Match Joint Strength to Stud Size and Load Requirements

Choosing the right metal stud joint begins with the load, not convenience. A light partition may need a simple overlap joint, while a taller wall or heavily loaded assembly requires stronger fastening and closer spacing. Tip 1: Confirm the stud gauge and width before selecting the joint. Tip 2: Calculate expected loads, including doors, cabinets, fixtures, and wall finishes. Tip 3: Match the joint’s tested capacity to those loads, leaving a sensible safety margin.

On site, joint quality often decides whether a strong design performs well. Tip 4: Use the specified screw type, diameter, and embedment length. Tip 5: Keep fasteners away from damaged edges and avoid loose connections. Tip 6: Check that studs remain aligned during installation. A twisted joint can transfer force unevenly. I have seen small alignment errors create visible cracks later. That detail is easy to underestimate. Moisture also matters, especially near bathrooms or exterior walls, so inspect coatings and cut edges before closing the wall.

Tip 7: Ask for project-specific engineering when loads, height, or movement exceed ordinary conditions. Manufacturer data, local standards, and an experienced inspector provide useful evidence. Still, published values may not reflect every site condition. Review the actual substrate, deflection needs, and installation sequence. A stronger joint is not always better if it causes excessive stiffness, weakens the stud, or complicates movement control. Conservative choices help, but careful judgment remains necessary.

7 Tips for Choosing Metal Stud Joints? - Match Joint Strength to Stud Size and Load Requirements

Tip Primary Design Input Typical Stud Range Suitable Joint Approach Typical Detailing Guidance Load or Performance Check
1. Match the joint to stud thickness Stud material thickness and profile depth Approximately 0.45–0.95 mm steel thickness; 50–150 mm web depth Self-drilling screw connection for light-gauge members; bolted or reinforced connection for heavier sections Use fasteners that can penetrate both connected layers without excessive protrusion or thread stripping. Check screw pull-over, pull-out, shear, local web crippling, and section yielding.
2. Identify the joint function Connection type: track-to-stud, stud-to-track, noggin, header, or stud splice Non-load-bearing partitions commonly use lighter sections; load-bearing walls require structural design Use a direct flange connection for framing intersections and a designed lap or sleeve for splices Avoid relying on a single screw where the joint transfers measurable tension, shear, or moment. Determine the design action at the joint rather than selecting a connection only by stud size.
3. Provide adequate splice overlap Stud length, axial force, bending, and available installation space Common light-gauge framing details use an overlap or sleeve long enough to develop the required fastener group Sleeve splice, boxed splice, or lapped stud connection Use a continuous internal sleeve where possible; keep fasteners away from unsupported edges and arrange them symmetrically. The splice should develop the required axial and lateral forces without excessive slip or local buckling.
4. Select the correct fastener group Number of connected layers and required joint capacity Common framing screws are approximately 3.5–5.5 mm in diameter, subject to design requirements Use multiple self-drilling screws for light connections; use bolts or engineered anchors for higher forces Maintain practical edge and end distances, avoid screw clustering, and stagger fasteners where the flange permits. Calculate the total group resistance and check the weakest failure mode, not only the nominal screw strength.
5. Consider spacing and load distribution Stud spacing, lining weight, wind pressure, and service loads Typical partition stud spacing is about 300–600 mm; structural layouts may differ Use additional noggings, bridging, or reinforced junctions where loads are concentrated Provide support behind heavy fixtures, door frames, cabinets, and board joints instead of loading a single thin flange. Check deflection, rotation, fastener slip, and load sharing between adjacent studs.
6. Account for movement and environment Building movement, moisture, temperature, and corrosion exposure Use corrosion-protected steel appropriate to the interior, humid, or exterior exposure category Use deflection-track or slip joints where vertical movement is expected; use compatible corrosion-resistant fasteners in damp locations Do not rigidly bridge a designed movement joint, and protect cut edges where the coating has been damaged. Check movement allowance, differential corrosion risk, fire performance, and acoustic requirements.
7. Verify the joint before installation Applicable building code, project specification, tested assembly, and calculated design actions Use engineering data for the actual steel grade, thickness, screw type, and connection geometry Prototype testing or a documented engineered detail for non-standard or high-load joints Inspect screw installation, minimum penetration, alignment, member damage, and continuity of reinforcement. Confirm strength, serviceability, fire, acoustic, corrosion, and constructability requirements before approval.

Note: The dimensions and ranges above are typical preliminary guidance for light-gauge steel framing. Final joint capacity must be verified for the actual steel grade, section geometry, fastener properties, loading, and applicable building code.

Check Material Compatibility and Corrosion Resistance

7 Tips for Choosing Metal Stud Joints

Metal stud joints must match the base metal, coating, and site environment. Galvanized steel joined with bare aluminum can create galvanic corrosion when moisture bridges both surfaces. The NACE IMPACT study estimated global corrosion costs at about 2.5 trillion US dollars annually, equal to roughly 3.4% of global GDP. That figure shows why a small joint deserves serious inspection.

Use compatible metals whenever possible.

Check coating thickness.

Keep water away.

Key Selection Tips

  1. Tip 1: Confirm whether the studs are galvanized steel, stainless steel, or aluminum.
  2. Tip 2: Select fasteners with compatible electrochemical properties.
  3. Tip 3: Review ISO 12944 guidance for corrosive exposure categories.
  4. Tip 4: Avoid scratched coatings around screw holes.
  5. Tip 5: Use isolating washers when dissimilar metals cannot be avoided.
  6. Tip 6: Inspect cut edges before closing the wall.
  7. Tip 7: Record the joint material and installation conditions.

Shortcuts are tempting.

The American Galvanizers Association explains that zinc coatings protect steel through barrier protection and sacrificial action. However, protection weakens at cut edges, damaged corners, and trapped wet insulation. In field inspections, I would check joint contact, drainage, and visible rust before judging the connection.

A dry indoor room needs less protection than a coastal or industrial location.

That distinction is easy to miss. A clean-looking joint may still conceal corrosion.

The best selection depends on the actual exposure, not only the drawing.

Evaluate Installation Method, Tools, and Accessibility

7 Tips for Choosing Metal Stud Joints

Choosing a metal stud joint begins with the installation method. For light partitions, screw-fixed joints offer controlled alignment and easy adjustment. Crimped joints can be faster, but they demand accurate tool pressure. I once rushed a crimped connection and found a slight twist after boarding. The joint looked secure, yet the frame needed correction. Check the project specifications before selecting either method.

Tool access often decides whether a joint works in practice. Measure the gap between studs, nearby walls, and finished surfaces. A compact driver may reach a narrow corner better than a longer tool. Keep the fastener head flush, and avoid crushing the stud flange. Test one joint on spare material. This simple check reveals slipping bits, weak engagement, or awkward hand positions.

Inspect every connection from more than one angle. The joint should feel firm without excessive movement. Use a level, tape measure, and suitable cutting tools, not guesswork. In ceiling tracks, limited overhead clearance may favor a simpler fastening method. In crowded service zones, accessibility matters more than installation speed. Follow manufacturer instructions for the joint system and local building requirements. My own preference has changed: the fastest method is not always the most reliable. A few extra minutes can prevent misaligned boards, uneven corners, and difficult repairs.

Verify Alignment, Fastening Quality, and Long-Term Durability

7 Tips for Choosing Metal Stud Joints?

Tip 1

Check alignment before fastening. Studs should meet cleanly, with flanges sitting flush against the track. Use a level and a straightedge, not only your eye. A small twist can create visible wall movement later.

Tip 2

Match the joint type to the load. Lightweight partitions may need simple overlaps, while heavier assemblies require reinforced connections. Always follow the project’s engineering requirements.

Tip 3

Inspect screw placement. Fasteners should penetrate fully without tearing the metal. Keep spacing consistent and avoid placing screws too close to an edge.

Tip 4

Look for firm contact. Loose joints often reveal themselves through rattling, uneven surfaces, or slight gaps. Press the connection by hand. It should feel stable.

Tip 5

Protect against corrosion. Store studs off wet floors, and reject pieces with deep rust or damaged coatings.

Tip 6

Consider movement. Temperature changes, vibration, and building settlement can stress rigid joints. Allow the specified movement where the design requires it.

Tip 7

Record your checks. Photos, measurements, and fastener details make quality control easier. I have seen rushed joints pass a quick inspection, then loosen months later. That mistake is preventable.

Still, site conditions can expose weaknesses that drawings do not show, so inspect difficult corners twice.